Showing posts with label St. Patrick's Day. Show all posts

Thursday, March 17, 2011

Color Change Leprechaun Hat

Yesterday we took out the food coloring to see if we could turn this
Leprechaun Hat GREEN for St. Patrick's Day!

I wrapped some green construction paper around a cylinder vase, added a yellow band and a buckle and placed it on a circle cut from more green construction paper to look like the hat brim.

Then we added LOTS of green food coloring to the water.

Most of the white carnations did turn a light shade of green overnight.


With the extra carnations, each of the kids wanted to try a different color.
{Matthew-blue, Sarah-green, and Jillian-red}


They were pretty impressed with all the colored flowers this morning!


The kids were also excited to see the green pancakes Chris made them for breakfast.
{way to get crafty Chris!}


Happy St. Patrick's Day!

Wednesday, March 16, 2011

Fruit Loop Rainbow

This is the first time I have brought Fruit Loops into the house.  I try to steer clear of sugary cereals {although I have to confess my love of Honey Nut Cheerios - especially when I was pregnant!}
I hesitated buying them, but wanted to use them for a little rainbow craft and maybe a sorting and graphing activity too.

So, here are the sugary little fellas!
They are quite pretty!


Matthew was excited to see the colorful cereal.


He sorted the colors into 6 groups.
{great for color recognition}


We were about 1/2 way through sorting when he realized he can eat them!


I drew a rainbow on cardstock and then squeezed out a line of glue for each color. 
Matthew did a terrific job placing the Fruit Loops onto the rainbow.
{great for fine motor skills}


Finally, we glued on some marshmallow clouds.  I actually used hot glue and had Matthew squish a whole handful of marshmallows onto the glue - I wasn't sure if regular glue would hold the marshmallows, plus I'm addicted to my glue gun.


It turned out great!


Rainbow Centerpiece

I was trying to figure out what to do with the rest of the Fruit Loops and decided to make them into a centerpiece!
When Jillian came home we sorted the rest of the box.  Then the kids poured them into this glass jar color by color.


This rainbow on our table at dinner sparked a really good conversation about Eating a Rainbow of Fruits and Vegetables each day.  The kids were able to use the centerpiece as a visual reminder of what colors they had eaten.  The kids responded to it so well I think I will re-do a rainbow of beads or something non-sugary so that we will continue to have these 'Eat a Rainbow' conversations without looking at a jar of full of sugar!

Linking up to 733blog
Linking up to red ted art


Tuesday, March 15, 2011

Rainbow Snack

I've been seeing this St. Patrick's Day snack around and thought that I would surprise the kids with it after school today.


It was a big hit!
The whole rainbow was devoured and the kids ate fruit that they would not usually agree to eat.  Matthew even ate a slice of pear........with the peel on!!!

I used strawberries, orange slices, pineapple, pear, blueberries and grapes for the rainbow.
Mini marshmallows for the cloud and banana slices for the pot of gold at the end of the rainbow.

Enjoy!

Monday, March 14, 2011

Free St. Patrick's Day Printables

Aren't these just the cutest St. Patrick's Day Flags?!?


I found them here.
All you have to do is download the file and then print them out!

I printed them on heavy cardstock and at a printer because I wanted the printing to be top quality and I want them to last for a few years.

You just have to cut them out, fold on the marked line and then glue the tab over.  I used my trusty glue gun and then fed a thin red ribbon through.
Easy peasy and so cute and festive!


I also found this awesome St. Patrick's Day subway art printable here.
I printed this in a 8x10 size and framed it in an inexpensive frame.
It looks so cute!


Finally, for our 2 Irish Dancers in the house, I printed out this smaller 5x7 printable I found here.
The girls love it and have been 'jigging' all around.

Everyone's Irish on St. Patrick's Day, right?


I realize I've posted these St. Patrick's day freebies a little late, but I just found them this weekend.  For the next holiday I'll be sure to get any free printables I find out early so that you can print them out and enjoy them too!

Friday, March 11, 2011

Shamrock Pretzels

Here is a popular
St. Patrick's Day Snack!

White chocolate dipped Shamrocks!

It's so simple. 

Start with some pretzels......


......and dip in melted chocolate!

Add some extra chocolate into the middle of the shamrock to hold them together.
 Sprinkle with any green or St. Patrick's Day themed sprinkles you may have and pop in the fridge to set.

So easy and so yummy!


I dipped these pretzels very lightly in the chocolate {to try to minimize the sugar content} but it made them look a little transparent.  Next time, I think I would buy some yogurt covered pretzels and 'glue' them together with the melted white chocolate.

Enjoy!

Wednesday, March 9, 2011

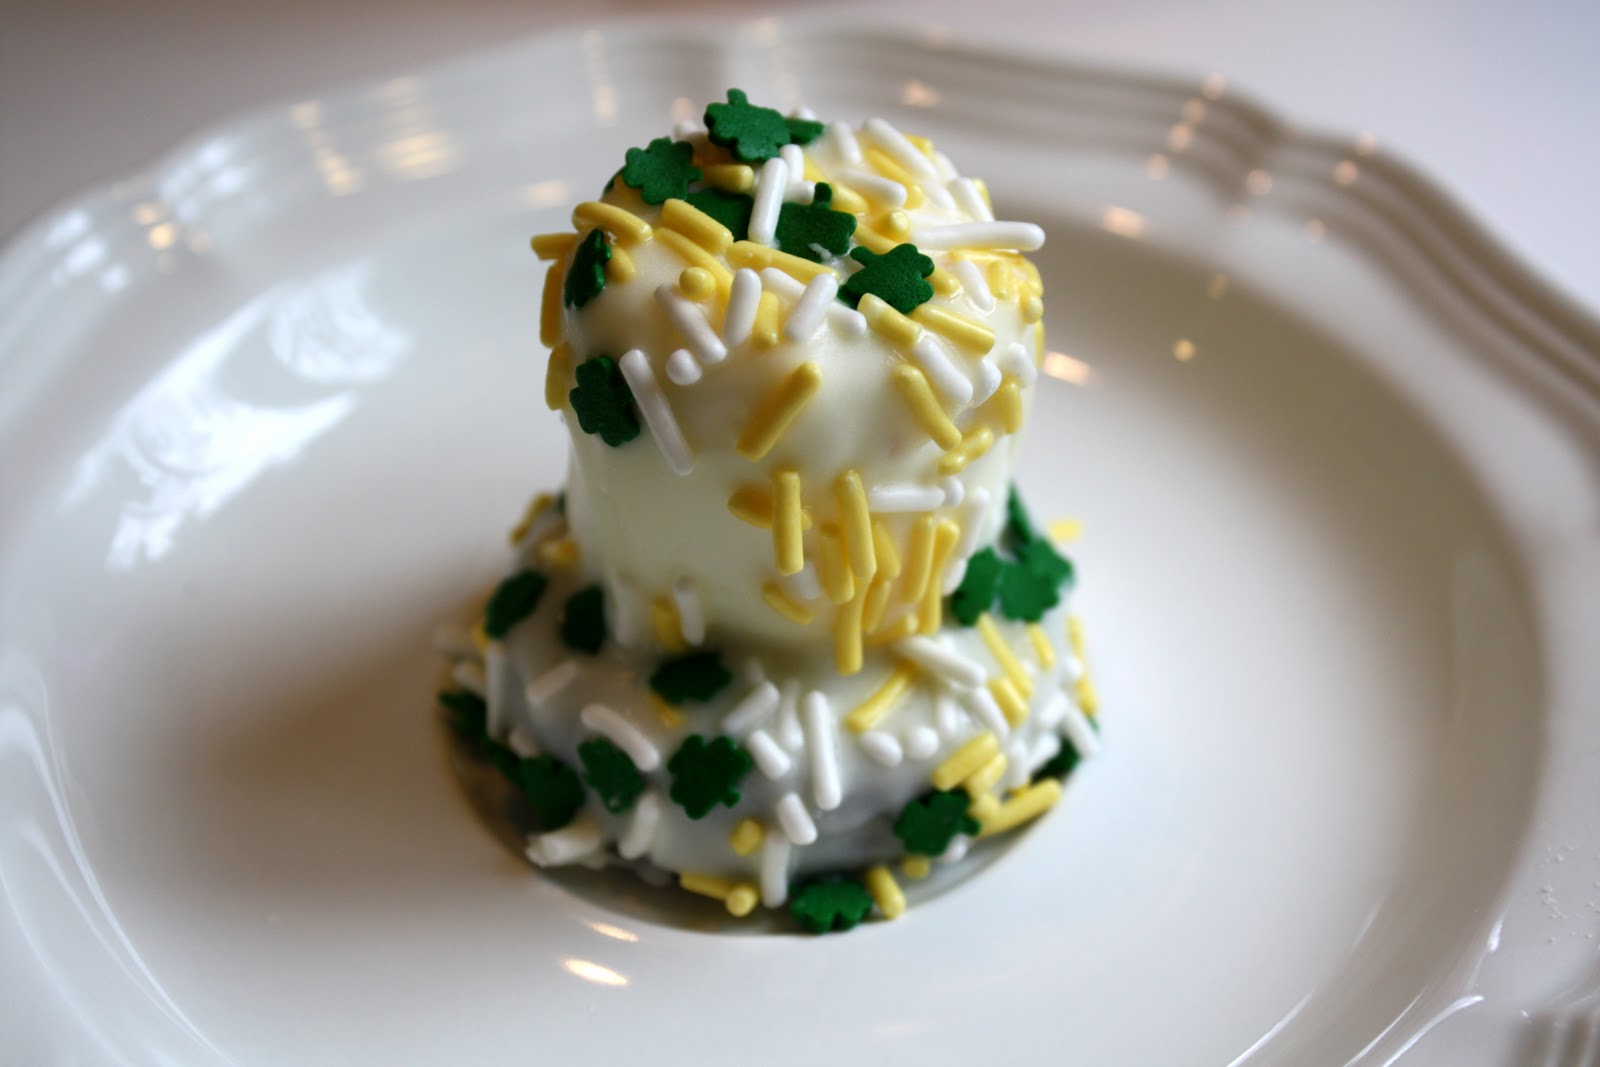
Leprechaun Hats

These HATS have turned out to be a very versatile snack!

You start with Oreos and marshmallows and then use your imagination.


They were Snowmen Hats in this post.


They were Abe Lincoln's tall top hat in this post.
{switched the marshmallow for banana}


And now with St. Patrick's Day coming up they are
Leprechaun Hats!


I melted white chocolate chips and poured the melted chocolate over the marshmallows and Oreos, then sprinkled them with Lucky Shamrock Sprinkles.


I wonder what they will turn into next?


Linking up to Sun Scholars
Linking up to Passionately Artistic

Tuesday, March 8, 2011

Crystal Rainbows and Shamrocks

We needed some St. Patrick's Day decorations in the house so I thought we could make some borax crystal shamrocks!
Click here for my original post with instructions on how to make borax crystals.

For the shamrocks I took one green pipecleaner and bent it into a shamrock shape.


After 24 hours in the borax solution they looked like this!


The rainbow was a little tricky.  I molded the pipecleaners into a rainbow shape and twisted them together at the ends {in no organized fashion as you can see}.  Then I got a big 8 cup batter bowl and used the ends of the pipecleaners as hooks to hold the rainbow upside down in the solution.
I put in 2 full scoops of borax {with the provided scoop}. 


Then I glued on some extra large cotton balls onto the ends of the rainbow to cover up the twisted ends of the pipecleaners.  I strung it with some green ribbon and hung it up on our mantle.


So pretty!


I bet you think I will be making little crystal bunnies, eggs and flowers next...........yup I probably will!

Have fun!

Monday, March 7, 2011

Make your own Stickers with Jello!

The kids can color, cut, paint, lick and stick all in one fun and yummy St. Patrick's Day activity!

First, I found some St. Patrick's Day pictures on line.  The kids colored the shamrocks, rainbows, and pots of gold.


Then I mixed 2 tbsp boiling water with 1 tbsp of the Jello powder and had the kids paint the back of their 'sticker' paper with the mixture.
Once dry they cut out their stickers!


 Then lick, lick, lick {yummy}
and
stick, stick stick {fun}.


We made a bowl of Jello with the remainder of the powder.  They had fun looking through it.
Check out their distorted alien faces!


Thursday, March 3, 2011

Rainbow Kool-Aid Playdough

A Rainbow of Kool-Aid Playdough!

I have always followed a homemade playdough recipe that uses the stovetop and been quite happy with the results.  This recipe, however, uses boiling water and is super easy.  I will not go back to using the stovetop to make playdough again!  Adding the Kool-Aid makes the playdough smell soooo yummy and colors the dough without having to fiddle with food coloring.

This is our new favorite homemade playdough recipe.
You have to try it out!!!


Ingredients

1 1/4 cups all-purpose flour
1/4 cup salt
1 pkg Kool-Aid Unsweetened Drink Mix, any flavor
1 Tbsp Cream of Tartar
1 cup boiling water
1 1/2 Tbsp oil
wax or parchment paper


Directions

Mix the first 4 ingredients in a large bowl. Add oil to the boiling water in a measuring cup and then pour into the dry ingredients.  Stir with a fork until most of the dry ingredients have been combined, then mix with your hands.

Put your playdough onto the wax paper and knead, knead, knead until it has become smooth and well blended - then start playing!

Store in a plastic bag or airtight container in the refrigerator.


There was a lot of smelling going on while making the dough!
The kids loved watching the colors come out when we added the boiling water.
{of course be super careful when using the hot water around the kiddos!}


Here is the result!

A rainbow of Kool-Aid playdough!

As you can see, the yellow didn't really turn out yellow and the green package of Kool-Aid really makes a pink strawberry-kiwi blend, oops!


The flavors that continued to smell the best and the strongest after a few days of play were the basics - cherry, orange, lemon and grape.


The only 'complaints' I would have with this recipe is that it is a tad 'oily'.  Perhaps cutting back on the oil would prevent some oil marks left on the counters after play.  But, the oil may be what makes this dough so smooth so I would be hesitant to cut it back.  Also, Cream of Tartar is a rather expensive item to buy at our local supermarket - oh how I miss the great prices of the Candian store 'The Bulk Barn'.  I will have to stock up on crafting and baking supplies our next trip north of the border.  I have seen a similar recipe that omits the Cream of Tartar.....I wonder how that would turn out?  I will have to try that the next time.


Idea from Meet the Dubiens.

Monday, February 28, 2011

Rainbow Bathtub Puzzle

This RAINBOW puzzle is made from foam sheets.  Did you know that they will stick to bathtub walls when wet?  FUN!  The rainbow theme is also a great way to get into the St. Patrick's Day spirit!

I started by tracing one of our mixing bowls onto regular white paper. 


Then I drew the arcs of the rainbow.
{This is where having a compass would have been handy!}


Next I used the template to cut out the rainbow colors from the foam sheets.

RED  ORANGE  YELLOW  GREEN  BLUE  PURPLE

OK - so a true rainbow has 7 colors (red, orange, yellow, green, blue, indigo and violet) but the foam sheets I found were pretty close and simply saying 'purple' is so much easier for kids!

The kids were excited for bathtime tonight knowing they had a rainbow puzzle to complete!


But they were especially excited when I told them that they could spray on some shaving cream clouds once they finished their rainbow!


Have fun!

Linking up to SunScholars
Linking up to It's a Hodgepodge Life, PetiteHermine

Related Posts Plugin for WordPress, Blogger...