Thursday, March 31, 2011

April Fool's Day

Tomorrow night we will be going to our church for a fundraising dinner so we won't be doing an April Fool's themed dinner.  IF we were eating at home this is what I would have made for dinner.  Isn't it cute!

Cupcakes!
{meatloaf cupcakes with mashed potato frosting}

Fried egg dessert!
{Yogurt and half a peach}

And IF I had planned and been more organized I would have loved to have made this cute snack for the kids.

Sushi!


BUT April Fool fun is not completely lost on us.  Tomorrow the kids will have a few fun lunch items.

Lips and Teeth

Apple with a Caterpillar

A Buggy Sandwich


And some lunch time entertainment.

Happy April Fools

Wednesday, March 30, 2011

Dinner Magician

 Here is a cute activity that the kids loved! 
You take 5 toothpicks and break them in half without completely breaking them apart.  Place them on a plate with the broken ends together.  Then drop a few drops of water into the middle with a dropper or a straw.....  


.....and watch as the toothpicks move before your eyes and form a 5 point star!


The science of this is something to do with capillary action but I simply said to the kids that as the wood absorbs water they start to straighten out.  They each wanted a turn at being the dinner magician and make their own star.  A fun little after dinner activity!

Idea found at Almost Unschoolers

Tuesday, March 29, 2011

Have you Filled a Bucket Today?

Have you ever read this book?

It's such a wonderful book that helps kids visualize how their words and actions affect other people.
It talks about how positive words and actions will 'fill' someone's bucket with happiness and good feelings and how negative words and actions will 'empty' buckets.  It encourages children to be 'bucket fillers' and not 'bucket dippers'.  These simple words, descriptions, and pictures seem to really connect with children and we frequently use these terms to encourage positive behavior with our kids. 


I had the opportunity to read this book and do a 'Bucket Filling' activity with Sarah's Daisy group last week.  All the girls were so attentive to the book and were more than willing to contribute bucket filling ideas.

After the book was read they each decorated a silver bucket with their name and some colorful stickers.  

Finally, they filled out these note cards for each member of the Daisy group so that every girl would bring home a bucket full of positive 'bucket filling' notes. 


You can find this printable and more at What the Teacher Wants.

Remember to ask yourself at the end of each day.....
"Did I fill a bucket today?"


Monday, March 28, 2011

Paint Chip Hyacinth

Oh, how I love spring bulb flowers!  Tulips and hyacinths are my favorites!

While shopping the other day I saw a these beautiful blue-purple paint chips and thought that we could make a paint chip hyacinth!

The kids took turns punching out 1 1/2 inch circles from the paint chips with a circle punch....


....and then cut the paint chips in half.


With some bright green paint chips they cut out a stem and some leaves.
Then they started gluing their cut outs onto a white piece of cardstock.


Here are their simple and beautiful creations!


Happy Spring!

Thursday, March 24, 2011

Painting with your Veggies

Here is a fun and 'out of the box' painting activity.
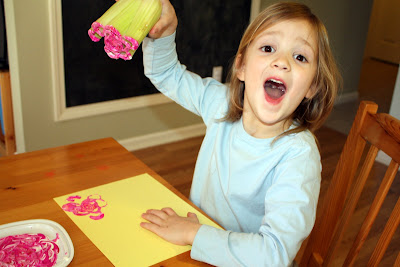
I cut off the end of a celery stalk and used it to make flower prints.


I'm so glad I had the camera ready to catch Jillian's reaction when she lifted the celery up.
She had a great time printing a few flowers on her paper, but she was done in about 30 seconds!


So, I poured out a bunch of different colors......


.....rolled out a long piece of paper, painted on some flower stems, and had Jillian and Matthew stamp flowers in their flower garden.


Such a pretty garden.
{with no weeding required!}


Idea found at Homemade Serenity

Wednesday, March 23, 2011

Counting to 100

It's way past the 100th day of school but I thought I would still talk about this fun book.  It's filled with great pictures and ideas to encourage kids to count to 100!


After reading the book Sarah immediately wanted to try a few of the ideas.
The first one she wanted to try was the snack.  She picked out 10 different snacky items from the pantry and counted out 10 of each.  A great way to practice counting by 10's.


And a very yummy reward for her efforts!


The kids also wanted to try making the playdough hedgehog with 100 toothpicks in it.  They actually became quite attached to their prickly little friends which were displayed for a few days before I tossed them into the garbage.  Naturally, Jillian asked where her 'Hedgie' was later that day.  There were even tears when she learned that Hedgie had been tossed, but as you can see it was quite a dangerous little 'toy' to have around!!!


Shared at Sun Scholars

Tuesday, March 22, 2011

Lava Lamp

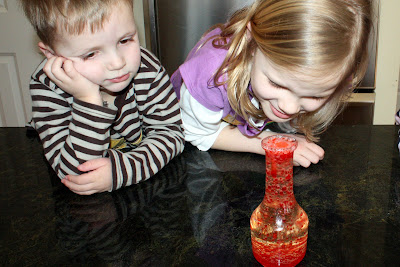
I was all excited to do this activity with the kids and have them ooohhhhh and aaahhhhh.  Matthew was a bit bored {as you can see in the picture below} and Jillian had already tried it at preschool.
Good thing Sarah loved it!

First, find a jar or bottle and pour some water into the bottle.  Our bottle was small so we filled it until it was about an inch high.  Then pour vegetable oil in, leaving some room at the top.  We waited a little and watched the oil and water separate.  Then we added a bunch of food coloring {the kids put in about 6-8 drops} and watched as the drops of coloring passed through the oil to the water.


Then I broke some Alka Seltzer tablets into quarters and let them drop them in one at a time.
{for a bigger bottle you would probably want to use 1/2 a tablet} 


Then Sarah ooohhhh'd and aaahhhh'd as the red blobs and bubbles rose up through the oil!
{apparently this was still not enough excitement for Matthew}


This was a fun activity and the best part is you can keep doing it over and over.  If you have a bottle with a cap you can just store your 'lava lamps' and use them again and again!


Just don't let your kids put all their pieces of seltzer into the bottle at the same time - the kids loved all the bubbles but I had a counter of overflowed oil to clean up!

 
Idea from Science Bob


Monday, March 21, 2011

Make your own homemade butter!

This was a fun activity for the whole family!
We took a jar (ours was a pickle jar) and some heavy whipping cream.
Pour the cream into the jar and .......


SHAKE, SHAKE, SHAKE!


This was a really cool process! 
Sarah had made butter before in preschool so she was coaching us along and telling us what was happening.

The trick is you have to listen!

So first, you will shake and shake and hear the the cream sloshing around.
After a lot of shaking you won't hear the liquid anymore.  This is good - your cream is starting to turn into butter, but don't stop there!
Keep shaking and shaking until you hear liquid sloshing around again.  That's the buttermilk separating from the butter!

You have made butter!
{it took us about 15 min}

We poured it into a bowl and this is what it looked like. 


I wasn't sure what to do with this big clump of butter!
Sarah said we had to strain it, so we strained it through a small wire strainer to get all the buttermilk out.

Then we put it into little candy molds and made cute butter flowers!
{I put the molds into the freezer so that I could pop out the butter easily, it worked well}


Have Fun!

Sunday, March 20, 2011

Bird in a Nest Breakfast

It's the first day of spring!

We made a 'Bird in a Nest' breakfast to celebrate.

The bird is a hard boiled egg with clove eyes and a cheddar cheese beak that we poked into the egg with a little piece of uncooked spagetti.  The nest is just buttered toast cut into strips.

Here is the little bird Sarah made.


Happy Spring!

Friday, March 18, 2011

Rainbow Salt Art

Here is a fun little salt art activity!
All you need is an old plastic container, table salt, and some sidewalk chalk in different colors.
Grind the sidewalk chalk into the salt and against the side of the container.  I tried this in little glass bowls and the chalk did not wear down easily - you need an old plastic container.
The chalk will start to color your salt!
{this activity was too hard for my 3 year old but great for my 7 year old because you have to grind the chalk down and that takes some elbow grease}


Repeat with lots of different colors.
We used the colors of the rainbow!


And fill a decorative glass jar.
{Even though Matthew could not grind the chalk into the salt he loved using the funnel to fill the glass!}


A sweet and simple craft!
Have Fun

Thursday, March 17, 2011

Color Change Leprechaun Hat

Yesterday we took out the food coloring to see if we could turn this
Leprechaun Hat GREEN for St. Patrick's Day!

I wrapped some green construction paper around a cylinder vase, added a yellow band and a buckle and placed it on a circle cut from more green construction paper to look like the hat brim.

Then we added LOTS of green food coloring to the water.

Most of the white carnations did turn a light shade of green overnight.


With the extra carnations, each of the kids wanted to try a different color.
{Matthew-blue, Sarah-green, and Jillian-red}


They were pretty impressed with all the colored flowers this morning!


The kids were also excited to see the green pancakes Chris made them for breakfast.
{way to get crafty Chris!}


Happy St. Patrick's Day!

Wednesday, March 16, 2011

Fruit Loop Rainbow

This is the first time I have brought Fruit Loops into the house.  I try to steer clear of sugary cereals {although I have to confess my love of Honey Nut Cheerios - especially when I was pregnant!}
I hesitated buying them, but wanted to use them for a little rainbow craft and maybe a sorting and graphing activity too.

So, here are the sugary little fellas!
They are quite pretty!


Matthew was excited to see the colorful cereal.


He sorted the colors into 6 groups.
{great for color recognition}


We were about 1/2 way through sorting when he realized he can eat them!


I drew a rainbow on cardstock and then squeezed out a line of glue for each color. 
Matthew did a terrific job placing the Fruit Loops onto the rainbow.
{great for fine motor skills}


Finally, we glued on some marshmallow clouds.  I actually used hot glue and had Matthew squish a whole handful of marshmallows onto the glue - I wasn't sure if regular glue would hold the marshmallows, plus I'm addicted to my glue gun.


It turned out great!


Rainbow Centerpiece

I was trying to figure out what to do with the rest of the Fruit Loops and decided to make them into a centerpiece!
When Jillian came home we sorted the rest of the box.  Then the kids poured them into this glass jar color by color.


This rainbow on our table at dinner sparked a really good conversation about Eating a Rainbow of Fruits and Vegetables each day.  The kids were able to use the centerpiece as a visual reminder of what colors they had eaten.  The kids responded to it so well I think I will re-do a rainbow of beads or something non-sugary so that we will continue to have these 'Eat a Rainbow' conversations without looking at a jar of full of sugar!

Linking up to 733blog
Linking up to red ted art


Related Posts Plugin for WordPress, Blogger...