Friday, April 29, 2011

Little notes.....

I've always planned to stick the occasional little note or inspirational quote on the mirror in the kids bathroom.  I think the girls are now old enough to appreciate some of the more kid-friendly quotes that I have been collecting.

Here are few of my favorites.....

whatilove


I hope you can use these too!

Thursday, April 28, 2011

Iced Choco-milk

I modified this great idea by simply freezing store bought chocolate milk in an ice cube tray and adding it to the kids milk for lunch and snack time.  When we give the kids chocolate milk we usually mix it with regular milk anyway, so this was a great idea for us!!!


The kids liked waiting for the chocolate ice cubes to start melting and then mushing them up to turn the milk into a chocolate slushy - yummy!


Linking up to Sun Scholars

Wednesday, April 27, 2011

Sewing for Kids

This was such a great idea that I found at Filth Wizardry.
Sarah has been wanting to sew but I knew she wasn't ready to handle thin thread, a sharp needle, and fabric.
However, she IS ready for yarn, a plastic needle, and a no-slip shelf liner.
BRILLIANT
....and such a perfect activity for our Sarah!


I took some Sharpies and drew out a pattern on the liner.  Then Sarah just sewed along!


This held her attention for a whole afternoon.  She even took it along to dance class where she has to wait for Jillian's class to finish before hers begins.  It was so cute watching her happily sewing away in the waiting area.

Here is the finished product!

She did such a nice job!

Tuesday, April 26, 2011

Egg Drop

As soon as I read this peeps experiment at Almost Unschoolers I knew we would have to give it a try!  After all, we had a bunch of peeps left over from our Easter vase that we had to get rid of.

First, I let the kids drop a raw egg off the side of our deck to see what would happen.......


Then, I set out some supplies and let them create a protective holder for the next egg drop.


With some guidance, this is what they came up with - the egg surrounded with peeps, closed, and taped into a sour cream container.


Sadly, our little peep-protected egg didn't make it......to see one that did check out the experiment over at Almost Unschoolers.

Determined to have one successful egg drop, we raided the recycling bin and found a plastic strawberry container.  Then we found some air fill packaging {from our last Amazon delivery}, tucked the egg inside, taped the container shut, and tried again.


SUCCESS!!!
Our little egg made it!


Conclusion - Amazon is correct in packaging product with air-fill packaging rather then peeps!

Monday, April 25, 2011

Egg Experiments

!!!STOP!!!

Don't throw your Easter eggs out yet!
Here are bunch of cool little experiments that you can do with them.

Experiment No 1 - Sink or Float

Fill one glass with regular water and a second glass with water and about 4-5 tbsp of salt {kosher salt will not turn the water cloudy, but you could use table salt too}.
Grab two of your hard boiled egss {you can can also use raw} and ask the kids what they think will happen to the eggs in each glass.
The egg will sink in the plain water and float in the salt water {since the salt in the water makes it more dense, it will be able to hold up the egg}.


You can also fill a glass half full with the salt water and slowly add plain water.  Add the plain water by pouring it gently onto a spoon and letting it fall down the side of the glass so you don't mix the salt and regular water.  Then gently drop your egg into the glass - it will sink down through the regular water and then stop when in hits the more dense salt water.
{I think I mixed the two solutions in our experiment because the egg stopped very close to the bottom of the glass}


Experiment No 2 - Folding Egg

Place one of your blown out Easter eggs into a glass of vinegar.  Either hold it under the vinegar until it fills and will stay submerged or use something to weigh it down.  The vinegar will start to dissolve the shell and leave only the membrane.  The experiment {found here} says this will take up to 10 days.  We must have super vinegar because our egg shell started to crack a bit from the spoons I placed on it to hold it down.  I was easily able to peel off the shell from the membrane within a few hours!  With a little bit of air {we used a syringe to fill it with air} you have an egg shape that you can fold, squeeze and fool others with.  It didn't work nearly as well as I thought, but it was still neat for the kids to feel the texture of the egg membrane.


Have fun with those eggs!

Friday, April 22, 2011

Earth Day

It's Good Friday AND Earth Day!

Today we had a really nice family day.  We talked about the meaning of Good Friday and how Easter is really not all about the Easter bunny.  The kids are well aware of this but, in today's marketing driven world, there is always a need to reinforce things.

Then, I had a few fun Earth Day activities lined up for the kids.

Nature Scavenger Hunt
I found this spring scavenger hunt and thought it would be perfect for Earth Day!
I wrote out a list of 12 items for the kids to look for: pine needles, grass, acorns, mulch, pinecones, green leaves, dried leaves, a rock, a stick, moss, sand, and dirt.  I sent them out with an old egg carton and the hunt was on!


They were quite proud of themselves for working together to finish the hunt!


Mud, Dirt, and Worm Snack
I put chocolate pudding in a bowl, covered the pudding with oreo crumbs, and stuck in a few gummie worms.


Sarah and Jillian had seen this snack before - Matthew had not and his reaction was precious!
"Mommy, is that real dirt?" 
"Mommy, can you take the dirt off the gummie worm?"
"Can I eat it?" 


Recycled Milk Carton Wallet
I found this idea at Family Fun.  They have instructions, a video, and the template to make the wallet.  This was a 'mommy craft' and actually took longer than I thought it would.  Some of the folding can be a little tricky.  But, the kids love it and each want one of there own - so I will be cutting up a few more milk cartons tomorrow!


I love how it is the carton's cap that keeps the wallet closed.


Jillian loves it too!

Hope you had a great day too!

Thursday, April 21, 2011

Easter Eggs

We decorated some Easter Eggs today!

We did a combo of some blown out eggs and hard boiled.
The picture below is a sample of the kids work!
The first row of eggs are dotted with glitter, the second row is your regular dye job, and the third row is colored with melted wax.


Glitter Eggs
When I saw the glittered and spotted eggs {I think in my Family Fun mag} I knew we would have to try them!  We did these with our blown out eggs so that we will be able to keep these.

You need adhesive dots {which you can purchase at craft stores}, a bowl of glitter {the finer the glitter the better the result}, and a paint brush.

Place the adhesive dots, 1 or 2 at a time on your egg and dip into the glitter, making sure to cover the dot completely.  Use your dry paint brush to sweep away the extra glitter.  Continue until you are happy with the look of your egg!


Dyed Eggs
I always mess up the dyed eggs somehow!  I just guess how much vinegar to add and I think I tend to add too much - resulting in blotchy looking eggs.  I also tried dying them in a muffin tin this year.  This was super easy and convienent but since the eggs are not submerged you need to turn them around in the tin and if you get distracted {like I do} you can end up with half the egg being darker then the other half.


Melted Wax
We had never tried this before and it was pretty fun!  I hard boiled some eggs and then had the kids draw on the hot eggs with crayon.  The crayon melts nicely and creates a nice marbled effect when you color all over the egg.  You just need to set up a holder for the hot eggs so the kids don't burn themselves - I used the back of an egg carton.


For some more really neat egg decorating ideas check out  hands on: as we grow.

Have fun decorating!

Wednesday, April 20, 2011

Spring Vacation Week

It is spring vacation week and we have been doing some day trips to various attractions in CT.
On Monday we went to the Mystic Aquarium.


And finished the day with a trip to downtown Mystic where we ate at Mystic Pizza and topped it off with ice cream at Mystic Drawbridge Ice Cream.


Then, today {since our oldest daughter loves all things Native American} we thought we would go to the Pequot Museum.  We had such a GREAT time!!!  It is a beautiful museum that is engaging, educational and interactive!  I was really amazed with the attention and interest that all 3 kids had in the exhibits.  We all learned so much about the Pequot people and the history of Native Americans in Connecticut.
I wish I could have taken more pictures but the museum did not allow cameras in most of the exhibits.  After spending over 5 hours in the museum {yes!  We stayed in a museum....with 4 kids.....for over 5 hours!!!}  we went up the observation tower where we finally were able to pull out the camera.

Here are the kids at the top of the tower with Foxwoods Resort/Casino in the background.


And here is our sweet little guy who was dragged along to all the different places and just kept right on smiling.  We love our little Nathan!


Tuesday, April 19, 2011

Eggs - Full of Sound

Sarah came home with this neat activity that she did at school.  I thought that it would be a fun activity for Jillian and Matthew too!

You need 12 plastic eggs and 12 small items to fill both the eggs and the egg carton.


We used {clockwise from top left}: pasta, toothpicks, dice, cherrios, marbles, string, marshmallows, pennies, cotton balls, paper clips, rice and beans.


Then shake, shake, shake and listen carefully!  Try to match the sounds with the corresponding item in the egg carton.  After you have matched all 12 eggs open them up and see how well you have listened and identified the sounds!


This was a great activity that really held the kids attention, and it was so fun to see how excited they were for each other when they matched correctly!

Have Fun!

Monday, April 18, 2011

Easter Vase

Here is a super cute and inexpensive Easter centerpiece.
You need some peeps, jellybeans and 2 vases -where one can fit into the other. 

Here is Matthew with the candies from our first attempt.


I was thrilled when a cylinder vase we had around the house fit perfectly into the apothecary jar I've been using for our centerpieces lately.


We set the cylinder vase into the larger jar and filled the space between the 2 jars with the jelly beans and peeps.  It looked good but I wasn't loving it, so we tried again.....


I bought pastel jelly beans and some pink peeps and now am much happier with the result!


It looks great with just the lid of the apothecary jar on it but it will look even better once I get a few bunches of pink tulips {to fill the center cylinder vase} for our sweet Easter weekend centerpiece.

Idea seen at TipJunkie

Friday, April 15, 2011

Paint Chip Garland

This was the easiest Easter Garland!

I went to Wal-Mart {they carry the Better Homes and Gardens paint chip} and picked up a bunch of Easter color chips.  It has a 'punch-out' circle which I simply removed, strung with a pretty ribbon.....


......and hung from our mirror!


Once Easter is over I will just put all the paint chips into our craft box to be used for future projects.

So Easy!

Linking up to Skip to My Lou

Thursday, April 14, 2011

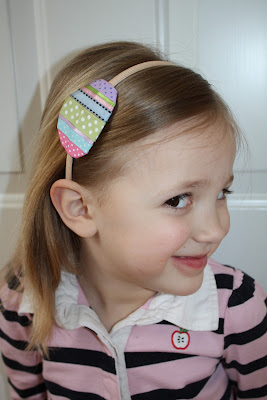
Easter Egg Ribbon Hairband

My girls love wearing hairbands!

When their favorite rosette hairband fell apart, I recycled it into a felt flower {found here}.  Now they are always coming up with new hairband ideas!  This time we decided that I should try an Easter Egg.  My first idea {which involved hot gluing little beads onto a felt egg} was a complete flop, so I tried using ribbons - they worked great!

It was super easy.
I traced an egg shape onto some felt with an egg shaped cookie cutter.
Then I hot glued a variety of Easter colored ribbons onto the felt egg.
This is what it looked like from the front.


And here it is from the back.


Then I folded and hot glued the ribbons onto the back of the egg - folding the ribbons around at different angles according to the shape of the egg.


Finally, I hot glued the ribbon egg onto a plain hairband and then hot glued a smaller egg shape onto the bottom to help provide support.


Here is the finished product!


I made one for both of my little Easter Bunnies.
Hippity Hop!

Wednesday, April 13, 2011

Salt Painting

Here is another craft using salt!  Draw a design or write some words with glue.  Pour a bunch of salt on top of the glue and shake off the excess. 


Add food coloring to a few bowls of water to make a variety of colored water. 
Get your paintbrush pretty full of the colored water and then gently touch the brush to the salt. 


The colored water will run along the salt/glue path!
You can also try experimenting with how the colors will mix......for example Jillian used yellow and blue which combined to make a hint of green.


At first our food coloring/water mixture was too concentrated and the color didn't run along the salt path very well.  I just watered down the colored water and it worked great.


This works best with black cardstock so that you can't see the colored water that bleeds off the salt and onto the paper.  This craft is pretty fun but I don't think it will keep well.  I tossed it once finished and didn't wait to see how it would dry.

This was a fun activity that I'm sure we will visit again!

Related Posts Plugin for WordPress, Blogger...